Stack Tab
The Stack Tab allows for the configuration of volume acquisition. Settable properties include the number of frames, the number of volumes, the type of actuator, and beam power at various depths.
Stack imaging can be toggled with the ‘Enable’ button at the top of the tab or from the Features GUI.
- Related Documentation:
Example Video
Example video here (todo)
Keyboard Shortcuts
Note: keyboard shortcuts are used when hovering the mouse in the Z view of the viewport.

The keybinds for stacks are differentiated by each stack type (bounded or arbitrary). See the Stack Definition Panel for more information.
Bounded Stacks
Shortcut |
Description |
|
Sets the top of the stack at the Display Slider |
|
Sets the middle of the stack at the Display Slider |
|
Sets the bottom of the stack at the Display Slider |
|
Toggles centered stack |
|
Shifts the stack up or down 5 µm |
|
Shifts the stack up or down 0.5 µm |
Click Top of Stack + |
Grows or shrinks top of stack by increments of 5 µm |
Click Top of Stack + |
Grows or shrinks top of the stack by increments of 0.5 µm |
Click Bottom of Stack + |
Grows or shrinks bottom of stack by increments of 5 µm |
Click Bottom of Stack + |
Grows or Shrinks top of the stack by increments of 0.5 µm |
Click Middle of Stack + |
Grows or shrinks both sides of stack by increments of 5 µm |
Click Middle of Stack + |
Grows or Shrinks both sides of the stack by increments of 0.5 µm |
Arbitrary Stacks
Shortcut |
Description |
|
Adds a new slice at the Display Slider as the last in the slice sequence |
|
Adds a new slice at the Display Slider as the first in the slice sequence |
|
Set the slice depth sequence |
|
Shifts the stack up 5 µm |
|
Shifts the stack down 5 µm |
|
Shifts the stack up 1 µm |
|
Shifts the stack down 1 µm |
Stack Definition Panel
Top Panel
Table Column |
Description |
Frames Per Slice |
Number of frames to acquire at a given z-depth |
Volumes Per Acquisition |
Number of times to repeat the z-stack for one acquisition |
Coordinate system |
Select the desired coordinate system |
There are two types of stacks: bounded and arbitrary. Bounded stacks are defined by a top and bottom depth and a set step size between slices. Arbitrary stacks allow for any set of Z depths.
Bounded Tab
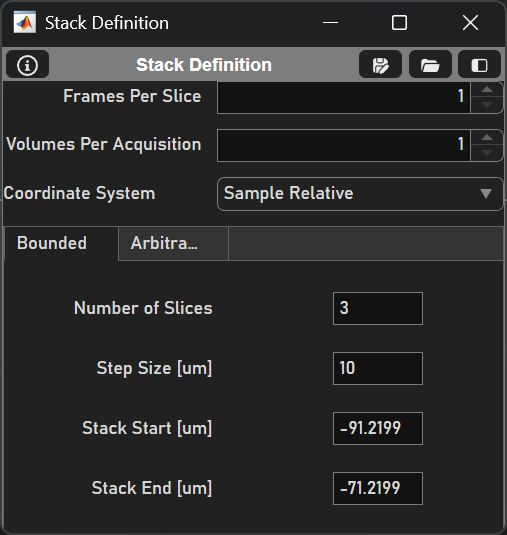
Configuration Options |
Description |
Number of Slices |
Number of slices in the stack |
Step Size (um) |
Amount that the actuator will move between Zs |
Stack Start (um) |
Starting Z of the stack (relative to current Z) |
Stack End (um) |
Ending Z (relative to current Z) |
Arbitrary Tab
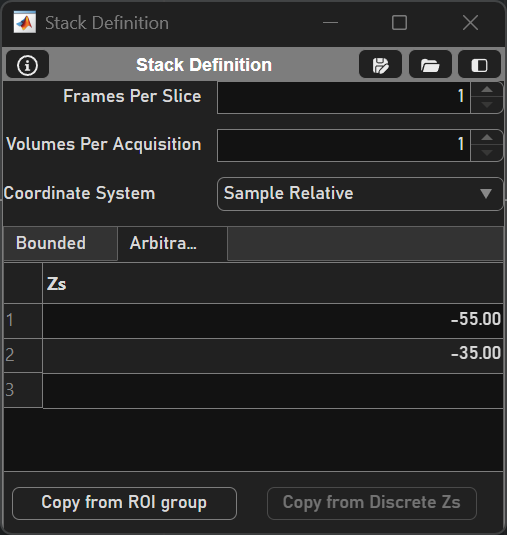
Configuration Options |
Description |
Z’s Table |
Table to specify each desired Z |
Copy from ROI Group |
Adds each of the corresponding Z’s from each scanfield in the ROI group into the stack |
Copy from discrete Z’s |
Adds each of the discrete Z-depths from the FastZDiscrete device Note Copying from Discrete Z’s is enabled only if there is an active Viewport and the associated fastZ is a FastZDiscrete device |
Stack Actuation Panel
The Stack Actuation Panel consists of the Slow and Fast tabs given the primary z actuator. A slow stack is designed for a slow actuator, as the acquisition is halted between each slice. See Stack Types for more.
Slow Tab
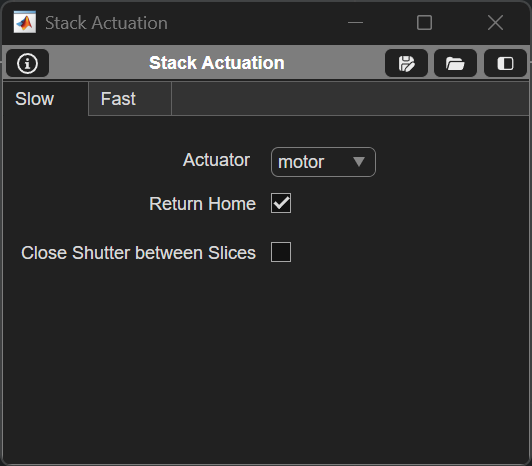
Table Column |
Description |
Actuator |
Dropdown to select actuator that will be responsible for changing Zs in the stack acquisition |
Return Home |
Option for actuator to return to previous position at the end of the acquisition |
Close Shutter between Slices |
Option to close the shutter when the actuator is moving |
Fast Tab

Element |
Description |
Waveform Type |
Dropdown to select the type of voltage waveform to send to the fastZ device (sawtooth or step) |
Return Home |
Option for actuator to return to previous position at the end of the acquisition |
Slice Transit Time (ms) |
Duration from the end of acquisition of the last frame of the current slice to the start of acquisition of the first frame of the subsequent slice. This is the same as the Y-Galvo flyback time |
Volume Flyback Time (ms) |
The amount of time allocated for the z-actuator to return after a stack is completed |
# Discard Frames |
The number of frames that are acquired during the flyback time (dependent on the volume flyback time) |
Actuator Lag (ms) |
Amount of time to advance the playback of the waveform relative to acquisition to account for actuator lag |
Volume Rate [Hz] |
The frequency at which volumes are acquired |
Power over Depth Panel
The power of the beam can be changed as the focal plane increases in Z.
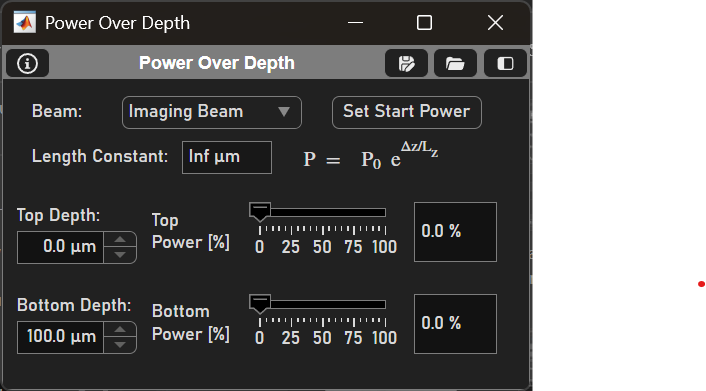
Element |
Description |
Beam |
Select desired beam |
Set Start Power |
Uses the formula \(P = P_0 \cdot e^{\frac{\Delta z}{L_z}}\) where
to set the power of the current beam |
Top / Bottom Depth |
Set the top and bottom Zs where the power will be modulated |
Top / Bottom Power [%] |
Set the desired power at the top and bottom Zs. This can be done via the slider or the textbox. Then, select the Set Start Power button |
Note that the depth and power of the beam can also be updated via the GUI in the Viewport’s ZView.